Introduction
Privilege escalation is not a one-step process, nor is it a simple one. It’s a journey that requires patience, persistence, and a thorough understanding of the target system’s configuration. There’s no one-size-fits-all approach, and much of it relies on specific system settings, such as the kernel version, installed applications, supported programming languages, and other users’ passwords.
In this blog post, we aim to cover the main privilege escalation vectors and give you a better understanding of the process. Whether you’re participating in CTFs, taking certification exams, or working as a penetration tester, mastering this new skill will undoubtedly become an essential part of your arsenal.
The road to privilege escalation requires patience, determination, and a solid knowledge of various techniques and tools. But once you’ve gained access to the coveted root shell, you’ll have unlocked a whole new level of control and power over the target system.
What is Privilege escalation?
Privilege escalation refers to the process of gaining higher levels of permission or access from a lower permission account. Technically, it involves exploiting vulnerabilities, design flaws, or configuration oversights in an operating system or application to gain unauthorized access to resources that are typically restricted from users.
But why is privilege escalation important?
In the real world of penetration testing, it’s rare to gain direct administrative access from the initial foothold. That’s where privilege escalation comes in as a crucial step. With system administrator levels of access, you can perform actions such as resetting passwords, bypassing access controls to compromise protected data, editing software configurations, enabling persistence, changing the privilege of existing or new users, and executing any administrative command.
In short, understanding privilege escalation is essential for successful penetration testing and maintaining system security. Knowing the ins and outs of this process can help you uncover vulnerabilities and weaknesses in your system’s security and address them before they can be exploited by malicious actors.
Types of Privilege Escalation
Privilege escalation can occur through different methods. two main types are vertical privilege escalation and horizontal privilege escalation

- vertical privilege escalation: also known as privilege elevation. In this scenario, an attacker compromises a user account on a system that has limited shell permissions. The attacker then searches for ways to increase their privileges using the same account. For instance, they may modify the sudoers file to grant themselves the ability to execute commands as a super-user or leverage setuid and setgid special permission bits to run an executable as a privileged user.
- horizontal privilege escalation: which is more common. In this case, the attacker gains access to another user on the system with higher privileges than their initial compromised account. With elevated privileges, an attacker can move through the network undetected.
How privileges are created and delegated in Linux systems
The /etc/passwd, is one of the most critical files on a Linux system. This file contains a list of all the users known to the system, including those included in directory services.
To view the contents of the passwd file, the “cat” command can be used. The output of the command provides information about each user, including their username, encrypted password, user ID, group ID, home directory, and default shell.
┌──(kali㉿ynuskyd)-[~]
└─$ cat /etc/passwd
root❌0:0:root:/root:/usr/bin/zsh
daemon❌1:1:daemon:/usr/sbin:/usr/sbin/nologin
bin❌2:2:bin:/bin:/usr/sbin/nologin
sys❌3:3:sys:/dev:/usr/sbin/nologin
sync❌4:65534:sync:/bin:/bin/sync
games❌5:60:games:/usr/games:/usr/sbin/nologin
man❌6:12:man:/var/cache/man:/usr/sbin/nologin
lp❌7:7:lp:/var/spool/lpd:/usr/sbin/nologin
mail❌8:8:mail:/var/mail:/usr/sbin/nologin
news❌9:9:news:/var/spool/news:/usr/sbin/nologin
uucp❌10:10:uucp:/var/spool/uucp:/usr/sbin/nologin
proxy❌13:13:proxy:/bin:/usr/sbin/nologin
www-data❌33:33:www-data:/var/www:/usr/sbin/nologin
backup❌34:34:backup:/var/backups:/usr/sbin/nologin
list❌38:38:Mailing List Manager:/var/list:/usr/sbin/nologin
irc❌39:39:ircd:/run/ircd:/usr/sbin/nologin
_apt❌42:65534::/nonexistent:/usr/sbin/nologin
nobody❌65534:65534:nobody:/nonexistent:/usr/sbin/nologin
geoclue❌118:125::/var/lib/geoclue:/usr/sbin/nologin
Debian-snmp❌119:126::/var/lib/snmp:/bin/false
sslh❌120:128::/nonexistent:/usr/sbin/nologin
ntpsec❌121:131::/nonexistent:/usr/sbin/nologin
redsocks❌122:132::/var/run/redsocks:/usr/sbin/nologin
rwhod❌123:65534::/var/spool/rwho:/usr/sbin/nologin
iodine❌124:65534::/run/iodine:/usr/sbin/nologin
miredo❌125:65534::/var/run/miredo:/usr/sbin/nologin
statd❌126:65534::/var/lib/nfs:/usr/sbin/nologin
redis❌127:133::/var/lib/redis:/usr/sbin/nologin
postgres❌128:134:PostgreSQL administrator,,,:/var/lib/postgresql:/bin/bash
mosquitto❌129:136::/var/lib/mosquitto:/usr/sbin/nologin
inetsim❌130:137::/var/lib/inetsim:/usr/sbin/nologin
_gvm❌131:139::/var/lib/openvas:/usr/sbin/nologin
king-phisher❌132:140::/var/lib/king-phisher:/usr/sbin/nologin
kali❌1000:1000:,,,:/home/kali:/usr/bin/zsh
Each line represents a user on the Linux system. and each field is separated using the colon “:” character in which the fields represent the following passwd file format:
- Username
- Password Placeholder - x indicates encrypted password in
/etc/shadow - User ID (UID)
- Group ID (GID)
- Personal Information (separated by comma’s)
- Home Directory
- Shell – absolute path to the command shell used
On Linux and Unix operating systems, any user with a user ID above 1000 is considered a non-default user and has been added to the system. However, the threshold may vary slightly depending on the specific operating system. The user ID “0” is reserved for the root account, which grants super-user privileges. Other users can also be assigned “UID 0” to give them similar privileges. Predefined accounts are assigned “Effective ID 0” and IDs ranging from 1 to 99. The range of IDs from 100 to 999 is reserved for system administration.
In some cases, you might find a “+” or “-” symbol in the UID field. This usually represents an account being used with a directory service, such as LDAP.
In older Linux systems, the password of the user was stored in the /etc/passwd file. However, this was deemed insecure, and a more secure method was introduced where passwords are stored in the /etc/shadow file. If the password placeholder field contains an “x,” it means the password is stored in the /etc/shadow file instead of /etc/passwd.
Why do we need to perform privilege escalation?
- To gain read/write access to sensitive files that are otherwise restricted from the user.
- To persist through reboots, making it easier for the attacker to maintain access to the system for an extended period of time.
- To insert a permanent backdoor that allows the attacker to regain access to the system even if they are kicked out by system administrators or security teams.
Privilege escalation techniques
To focus on privileged accounts, cyber attackers follow established methods and techniques to detect system misconfigurations, vulnerabilities, users with excessive privileges, and vulnerable credentials.

Enumeration
Enumeration is a crucial first step to take after gaining access to any system. Whether you obtained root-level access by exploiting a critical vulnerability or simply found a way to execute commands through a low privileged account, the penetration testing process doesn’t stop at gaining access to a specific system or user privilege level. In fact, as you will discover, enumeration is just as vital during the post-compromise phase as it is before.
hostname: returns the hostname of the target machine.uname -a: prints system information, including the kernel version./proc/version: provides information about the target system processes, including the kernel version and installed compilers./etc/issue: contains information about the operating system but can be customized or changed.ps: shows the running processes on a Linux system.
more on 'ps'
The ps command is an effective way to see the running processes on a Linux system.
The output of the ps (Process Status) will show the following;
- PID: The process ID (unique to the process)
- TTY: Terminal type used by the user
- Time: Amount of CPU time used by the process (this is NOT the time this process has been running for)
- CMD: The command or executable running (will NOT display any command line parameter)
The “ps” command provides a few useful options.
ps -A: View all running processesps axjf: View process tree (see the tree formation untilps axjfis run below)
ps aux: Theauxoption will show processes for all users (a), display the user that launched the process (u), and show processes that are not attached to a terminal (x). Looking at the ps aux command output, we can have a better understanding of the system and potential vulnerabilities.
env: shows environmental variables, including the PATH variable.
more on 'env'
The PATH variable may have a compiler or a scripting language (e.g. Python) that could be used to run code on the target system or leveraged for privilege escalation.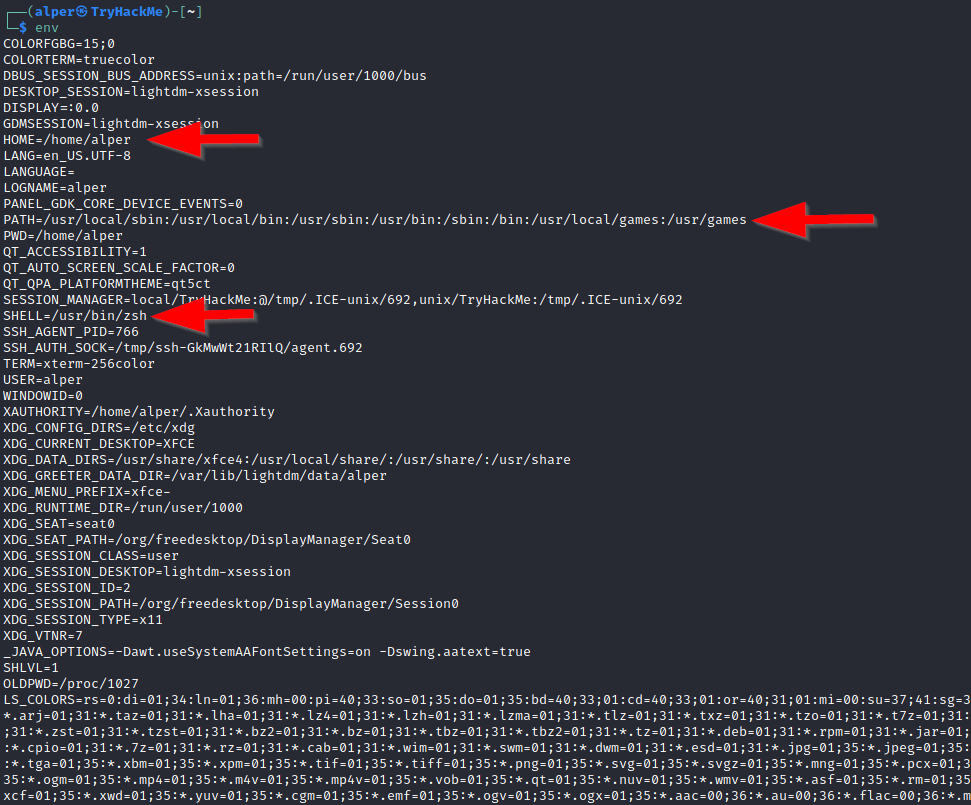
-
sudo -l:The target system may be configured to allow users to run some (or all) commands with root privileges. Thesudo -lcommand can be used to list all commands your user can run usingsudo. -
ls -la: lists all files in a directory, including hidden files. -
id: provides an overview of the user’s privilege level and group memberships. -
/etc/passwd: lists users on the system. grep home to see only real users┌──(kali㉿ynuskyd)-[~] └─$ cat /etc/passwd | grep home kali❌1000:1000:,,,:/home/kali:/usr/bin/zsh kali❌1001:1001:,,,:/home/kali:/bin/bash -
history: shows earlier commands executed on the target system. Looking at earlier commands with thehistorycommand can give us some idea about the target system and, albeit rarely, have stored information such as passwords or usernames. -
ifconfig: gives information about the network interfaces of the system. -
ip routecommand to see which network routes exist. -
netstat: gathers information on existing connections, including listening ports, established connections, and network usage statistics.
more on 'netstat'
netstat -a:shows all listening ports and established connections.netstat -at: lists all TCP connections.netstat -au: lists all UDP connections.netstat -l: lists ports in “listening” mode.netstat -s:lists network usage statistics by protocol.netstat -tp: lists connections with service name and PID information.netstat -i:shows interface statistics.netstat -ano:lists all active connections with PID and process information.
- find: Searching the target system for important information and potential privilege escalation vectors can be fruitful. The built-in “find” command is useful and worth keeping in your arsenal.
Some useful examples for the 'find' command.
-
find . -name flag.txt: find the file named “flag.txt” in the current directory -
find /home -name flag.txt: find the file names “flag.txt” in the /home directory -
find / -type d -name config: find the directory named config under “/” -
find / -type f -perm 0777: find files with the 777 permissions (files readable, writable, and- executable by all users) -
find / -perm a=x: find executable files -
find /home -user frank: find all files for user “frank” under “/home” -
find / -mtime 10: find files that were modified in the last 10 days -
find / -atime 10: find files that were accessed in the last 10 day -
find / -cmin -60: find files changed within the last hour (60 minutes) -
find / -amin -60: find files accesses within the last hour (60 minutes) -
find / -size 50M: find files with a 50 MB size -
Folders and files that can be written to or executed from:
-
find / -writable -type d 2>/dev/null: Find world-writeable folders -
find / -perm -222 -type d 2>/dev/null: Find world-writeable folders -
find / -perm -o w -type d 2>/dev/null: Find world-writeable folders -
Find development tools and supported languages:
-
find / -name perl* -
find / -name python* -
find / -name gcc*
It is important to note that the “find” command tends to generate errors which sometimes makes the output hard to read. This is why it would be wise to use the “find” command with -type f 2>/dev/null to redirect errors to “/dev/null” and have a cleaner output (below).
┌──(kali㉿ynuskyd)-[~]
└─$ find / -size +100M -type f 2>/dev/null
/home/kali/.BurpSuite/burpbrowser/110.0.5481.77/chrome
/home/kali/.local/share/Trash/files/combination.txt
/home/kali/CTFs/tryhackme/rockyou.txt
/proc/kcore
/usr/lib/x86_64-linux-gnu/libLLVM-15.so.1
Automated Enumeration Tools
During the enumeration phase of privilege escalation, it’s common for attackers to search for all the possible ways to elevate privileges by checking out the detailed version and configuration of the Linux system.
Some common commands used during the enumeration phase are the following:
| Enumeration Commands | Description |
|---|---|
id |
print real and effective user and group IDs |
whoami |
current user |
hostname |
show or set the system’s host name |
uname |
print system information |
ps -ef |
report a snapshot of the current processes |
echo $PATH |
print environment PATH variable |
ifconfig |
configure a network interface |
cat /etc/passwd |
show passwd file contents |
sudo -l |
list commands allowed using sudo |
find / -type f -a \( -perm -u+s -o -perm -g+s \) -exec ls -l {} \; 2> /dev/null |
Find all files suid and sgid files |
Commonly Used Privilege Escalation Tools:
- LinPEAS - Linux Privilege Escalation Awesome Script
- LinEnum - Linux Enumeration Script
- Linux Priv Checker
- Linux Exploit Suggester 2
- Linux Smart Enumeration
LinPEAS - Linux Privilege Escalation Awesome Script
- LinPEAS is a script designed to detect potential pathways for privilege escalation on hosts operating on Linux, Unix, or MacOS.
- The primary function of the script is to identify vulnerabilities in the system that can be exploited to elevate user privileges.
- It searches for common misconfigurations and weak permissions in files and directories that can be leveraged for privilege escalation.
- LinPEAS can enumerate running processes, open network ports, and installed software to detect vulnerabilities that can be exploited.
Github: LinPEAS
LinEnum - Linux Enumeration Script
This is an awesome Linux enumeration script. It’s run on the target host and searches for many of the common privilege escalation methods or misconfigurations.
Some of the enumeration information collected includes:
- Kernel and distribution release details
- System information
- User information
- Privileged access
- Environmental information
Github: LinEnum
Linux Priv Checker
Originally forked from the linuxprivchecker.py (Mike Czumak), this script is intended to be executed locally on a Linux box to enumerate basic system info and search for common privilege escalation vectors such as word writable files, misconfigurations, clear-text password and applicable exploits.****
Github: Linux Priv Checker
Linux Exploit Suggester 2
This next-generation exploit suggester is based on Linux_Exploit_Suggester.
Key improvements include:
- More exploits!
- Option to download exploit code directly from Exploit DB
- Accurate wildcard matching. This expands the scope of searchable exploits.
- Output colorization for easy viewing.
- And more to come!
This script is extremely useful for quickly finding privilege escalation vulnerabilities both in on-site and exam environments.
Github: Linux Exploit Suggester 2
Linux Smart Enumeration
Linux enumeration tools for pentesting and CTFs. This project was inspired by LinEnum and uses many of its tests. Unlike LinEnum, lse tries to gradualy expose the information depending on its importance from a privesc point of view.
Github: Linux Smart Enumeration
Common Privilege Escalation Techniques
- Privilege Escalation: Kernel Exploits
- Privilege Escalation: Abusing sudo-rights
- Privilege Escalation: SUID
- Privilege Escalation: Capabilities
- Privilege Escalation: Weak/reused/plaintext passwords
- Privilege Escalation: Cron Jobs
- Privilege Escalation: PATH
- Privilege Escalation: NFS
Privilege Escalation: Kernel Exploits
Privilege escalation ideally leads to root privileges. This can sometimes be achieved simply by exploiting an existing vulnerability, or in some cases by accessing another user account that has more privileges, information, or access.
Unless a single vulnerability leads to a root shell, the privilege escalation process will rely on misconfigurations and lax permissions.
The kernel on Linux systems manages the communication between components such as the memory on the system and applications. This critical function requires the kernel to have specific privileges; thus, a successful exploit will potentially lead to root privileges.
The Kernel exploit methodology is simple;
- Identify the kernel version
- Search and find an exploit code for the kernel version of the target system
- Run the exploit
Research sources:
- Based on your findings, you can use Google to search for an existing exploit code.
- Sources such as linuxkernelcves can also be useful.
- Another alternative would be to use a script like LES (Linux Exploit Suggester) but remember that these tools can generate false positives (report a kernel vulnerability that does not affect the target system) or false negatives (not report any kernel vulnerabilities although the kernel is vulnerable).
Hints/Notes:
- Being too specific about the kernel version when searching for exploits on Google, Exploit-db, or searchsploit
- Some exploits may require further interaction once they are run. Read all comments and instructions provided with the exploit code.
- You can transfer the exploit code from your machine to the target system using the
SimpleHTTPServerPython module andwgetrespectively.
Privilege Escalation: Abusing sudo-rights
If a user is part of the sudoers file and is permitted to execute certain binaries or executables using sudo, then in many situations it might be possible to abuse the sudo permissions and gain access to root. Gtfobins is an excellent resource to look for ways to bypass security restrictions on misconfigured systems
Any user can check its current situation related to root privileges using this command sudo -l.
Leverage application functions
Some applications will not have a known exploit within this context. Such an application you may see is the Apache2 server.
In this case, we can use a “hack” to leak information leveraging a function of the application. As you can see below, Apache2 has an option that supports loading alternative configuration files (-f : specify an alternate ServerConfigFile).
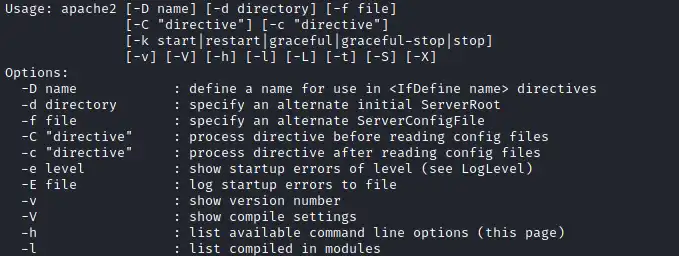
Loading the /etc/shadow file using this option will result in an error message that includes the first line of the /etc/shadow file.
Leverage LD_PRELOAD
On some systems, you may see the LD_PRELOAD environment option.

LD_PRELOAD is a function that allows any program to use shared libraries.
Privilege Escalation: SUID
Linux privilege controls heavily rely on managing the interactions between users and files through the use of permissions. As you may already be aware, permissions grant users the ability to read, write, and execute files based on their assigned privilege levels. However, the concept of permissions expands to include SUID (Set-user Identification) and SGID (Set-group Identification), which allow files to be executed with the permission level of either the file owner or the group owner, respectively.
You will notice these files have an “s” bit set showing their special permission level.
find / -type f -perm -04000 -ls 2>/dev/null will list files that have SUID or SGID bits set.
┌──(kali㉿ynuskyd)-[~/CTFs/tryhackme/PrevEsc]
└─$ find / -type f -perm -04000 -ls 2>/dev/null
  3322006    640 -rwsr-xr-x   1 root     root       653888 Feb  8 05:43 /usr/lib/openssh/ssh-keysign
  3321238     16 -rwsr-sr-x   1 root     root        14672 Feb  7 08:15 /usr/lib/xorg/Xorg.wrap
  3551549     52 -rwsr-xr--   1 root     messagebus    51272 Feb  8 08:21 /usr/lib/dbus-1.0/dbus-daemon-launch-helper
  3321635     20 -rwsr-xr-x   1 root     root          18664 Feb 12 22:15 /usr/lib/polkit-1/polkit-agent-helper-1
  3833220     36 -rwsr-xr-x   1 root     root          35128 Mar 23 06:02 /usr/bin/umount
  3835221     68 -rwsr-xr-x   1 root     root          68248 Mar 23 08:40 /usr/bin/passwd
  3833658    144 -rwsr-xr--   1 root     kismet       146216 Dec 27 10:04 /usr/bin/kismet_cap_nrf_mousejack
  3835712    140 -rwsr-xr--   1 root     kismet       142120 Dec 27 10:04 /usr/bin/kismet_cap_nrf_52840
  3835384    144 -rwsr-xr--   1 root     kismet       146216 Dec 27 10:04 /usr/bin/kismet_cap_nxp_kw41z
  3833714    212 -rwsr-xr--   1 root     kismet       216392 Dec 27 10:04 /usr/bin/kismet_cap_linux_wifi
  3833495    144 -rwsr-xr--   1 root     kismet       146216 Dec 27 10:04 /usr/bin/kismet_cap_rz_killerbee
  3833215     60 -rwsr-xr-x   1 root     root          59704 Mar 23 06:02 /usr/bin/mount
  3834888    276 -rwsr-xr-x   1 root     root         281624 Mar  8 15:17 /usr/bin/sudo
  3834378    140 -rwsr-xr--   1 root     kismet       142120 Dec 27 10:04 /usr/bin/kismet_cap_nrf_51822
  3833815    160 -rwsr-xr-x   1 root     root         162752 Mar 23 06:18 /usr/bin/ntfs-3g
  3834280    140 -rwsr-xr--   1 root     kismet       142120 Dec 27 10:04 /usr/bin/kismet_cap_ubertooth_one
  3835318    144 -rwsr-xr--   1 root     kismet       146216 Dec 27 10:04 /usr/bin/kismet_cap_ti_cc_2531
  3833996     48 -rwsr-xr-x   1 root     root          48896 Mar 23 08:40 /usr/bin/newgrp
  3841548     16 -rwsr-xr-x   1 root     root          14888 Jan  3 06:19 /usr/bin/vmware-user-suid-wrapper
  3834858     64 -rwsr-xr-x   1 root     root          62672 Mar 23 08:40 /usr/bin/chfn
  3833406     36 -rwsr-xr-x   1 root     root          35128 Feb 18 01:22 /usr/bin/fusermount3
  3834746    144 -rwsr-xr--   1 root     kismet       146216 Dec 27 10:04 /usr/bin/kismet_cap_ti_cc_2540
  3833367     32 -rwsr-xr-x   1 root     root          30872 Feb 12 22:15 /usr/bin/pkexec
  3835169     88 -rwsr-xr-x   1 root     root          88496 Mar 23 08:40 /usr/bin/gpasswd
  3834276    152 -rwsr-xr--   1 root     kismet       154408 Dec 27 10:04 /usr/bin/kismet_cap_linux_bluetooth
  3835510     72 -rwsr-xr-x   1 root     root          72000 Mar 23 06:02 /usr/bin/su
A good practice would be to compare executables on this list with GTFOBins Clicking on the SUID button will filter binaries known to be exploitable when the SUID bit is set you can also use this link for a pre-filtered list GTFOBins .
The list above shows that nano has the SUID bit set. Unfortunately, GTFObins does not provide us with an easy win. Typical to real-life privilege escalation scenarios, we will need to find intermediate steps that will help us leverage whatever minuscule finding we have.

The SUID bit set for the nano text editor allows us to create, edit and read files using the file owner’s privilege. Nano is owned by root, which probably means that we can read and edit files at a higher privilege level than our current user has. At this stage, we have two basic options for privilege escalation: reading the /etc/shadow file or adding our user to /etc/passwd
Privilege Escalation: Capabilities
System administrators have an additional method to elevate the privilege level of a process or binary, known as “Capabilities”. Capabilities offer a more fine-grained approach to managing privileges. For instance, if a SOC analyst requires a tool that requires socket connections, but does not have higher privileges, the system administrator can modify the capabilities of the binary instead of granting the user elevated privileges. This allows the binary to perform its task without requiring a user with higher privileges. This way, system administrators can maintain a higher level of security by limiting privileges to only the necessary actions, reducing the risk of unauthorized access or misuse of privileges. Overall, capabilities provide a more nuanced and flexible approach to privilege management in Linux systems.
When run as an unprivileged user, getcap -r /will generate a huge amount of errors, so it is good practice to redirect the error messages to /dev/null.
GTFOBins has a good list of binaries that can be leveraged for privilege escalation if we find any set capabilities.

Privilege Escalation: Weak/reused/plaintext passwords
It is common to come across weak or commonly reused passwords in Linux systems and applications when users create their passwords. For instance, if you discover a password being used for a web application, you may also find that the same password is used for the user account or even the root user. Conducting a search through common configuration files, such as config.php, or examining a user’s command history may reveal some interesting methods for elevating privileges.
Privilege Escalation: Cron Jobs
Cron jobs are a useful tool to automate the execution of scripts or binaries at specific times. By default, they run with the permissions of their owners rather than the current user. Although properly configured cron jobs are generally secure, they can pose a privilege escalation risk under certain circumstances.
Essentially, if a scheduled task is set to run with root privileges and we can modify the script that it will execute, then our script will also run with root privileges.
Cron job configurations are saved as crontabs, which enable users to see when tasks are scheduled to run. Each user on the system has their own crontab file and can set up specific tasks to run, even if they are not logged in. Our objective will be to identify a cron job that is set up by root and modify it so that it runs our shell script.
The system-wide cron job file, which contains all of the system-wide cron jobs, can be accessed and read by any user at /etc/crontab.
Privilege Escalation: PATH
If a folder for which your user has write permission is located in the path, you could potentially hijack an application to run a script. PATH in Linux is an environmental variable that tells the operating system where to search for executables. For any command that is not built into the shell or that is not defined with an absolute path, Linux will start searching in folders defined under PATH. (PATH is the environmental variable were are talking about here, path is the location of a file).
Typically the PATH will look like this:

Privilege Escalation: NFS
Privilege escalation vectors are not limited to internal access alone. Shared folders and remote management interfaces such as SSH and Telnet can also aid in obtaining root access on the target system. In certain cases, both vectors may need to be utilized, for instance, by discovering a root SSH private key on the target system and connecting through SSH with root privileges instead of attempting to elevate the privileges of the current user.
Another vector that is particularly relevant to CTFs and exams involves a misconfigured network shell. This vector can occasionally be observed during penetration testing engagements when a network backup system is in place.
The NFS (Network File Sharing) configuration is stored in the /etc/exports file. This file is generated during the installation of the NFS server and can usually be accessed by users.
Real-World Examples of Privilege Escalation
Recent Linux Kernel exploits, such as Dirty c0w and Nelson (Full Nelson and Half Nelson), can allow an unprivileged user to gain root access. Dirty c0w is a vulnerability that affected many Linux Kernels prior to 2018, exploiting a race condition within the memory management system’s copy-on-write mechanism. This vulnerability can be used to overwrite sensitive files like /etc/passwd. There are several variations of the Dirty c0w exploit, each using the same vulnerability but with slightly different elevation techniques. It’s crucial to verify the system architecture on the target system in this case.
Another exploit, Full Nelson (also known as Half Nelson), is a local privilege escalation technique and an older one. This technique can still be used to gain root access on many unpatched systems. These three vulnerabilities were discovered by the same researcher.
An example of the Dirty c0w vulnerability being used is as follows:


Mitigating Privilege Escalation
Mitigating privilege escalation refers to the strategies and best practices that can be used to prevent or minimize the impact of privilege escalation attacks on Linux systems. This involves implementing security measures to make it more difficult for attackers to elevate their privileges.
Tips for preventing privilege escalation
- Regularly update your systems and applications: One of the most important steps to prevent privilege escalation attacks is to keep your systems and applications up-to-date. Regularly applying security patches and updates can help prevent attackers from exploiting known vulnerabilities.
- Implement the principle of least privilege: This principle suggests that each user or process should have only the minimum permissions necessary to perform its intended function. This limits the potential damage that can be caused by an attacker who gains access to a user or process with elevated privileges.
- Use strong authentication and access controls: Passwords alone are not enough to secure critical systems or applications. Use strong authentication methods, such as two-factor authentication (2FA) or multi-factor authentication (MFA), and implement access controls to ensure that only authorized users can access sensitive data or resources.
- Regularly audit and monitor your systems: Keep an eye on your systems and regularly review logs to detect any suspicious activity. This will help you quickly identify and respond to potential threats, including privilege escalation attacks.
- Secure your sensitive data: Make sure that sensitive data, such as user credentials or personal information, is stored securely and encrypted when transmitted over the network.
Best practices for system security
- Regularly backup your data: Regular backups of your data can help ensure that you can quickly recover from any security incidents, including privilege escalation attacks.
- Use a firewall: Implement a firewall to control incoming and outgoing traffic to your network. This can help prevent unauthorized access to your systems and data.
- Limit network exposure: Reduce the number of services and ports exposed to the network. This will limit the potential attack surface for attackers.
- Use secure protocols: Use secure communication protocols, such as SSL/TLS, to encrypt sensitive data transmitted over the network.
- Implement security policies and procedures: Establish and enforce security policies and procedures to ensure that all users understand their responsibilities and follow best practices for security.
- Train employees on security best practices: Provide regular training and education to all employees on security best practices, including how to identify and report potential security threats.
By following these tips and best practices, you can help prevent privilege escalation attacks and maintain the security of your Linux systems.
Conclusion
In conclusion, privilege escalation is a serious security threat that should not be taken lightly. By implementing the best practices and understanding the techniques used by cybercriminals, organizations can significantly reduce the risk of privilege escalation and maintain the security of their Linux systems.
Summary of Key Points:
Privilege escalation is a technique used by cybercriminals to gain higher levels of access to a system or network. This can be done through various methods such as exploiting kernel vulnerabilities, weak passwords, configuration errors, weak file permissions, or exploiting SUID binaries.
There are two types of privilege escalation - vertical and horizontal. Vertical privilege escalation involves gaining higher levels of access to a system, while horizontal privilege escalation involves gaining access to other accounts with the same level of privilege.
It is crucial to understand the importance of privilege escalation for penetration testing and system security. By understanding how cybercriminals can escalate their privileges, security professionals can implement the necessary security measures to protect their systems and networks.
To mitigate privilege escalation, it is recommended to implement best practices such as moving passwords into the background using an enterprise password manager or PAM solution, practicing the Principle of Least Privilege, implementing Multi-Factor Authentication, patching and updating systems and applications, and auditing and logging all privilege access usage.
Final Thoughts:
Privilege escalation is a critical aspect of Linux system security that should not be overlooked. As cyber threats continue to evolve and become more sophisticated, it’s essential to have strong security measures in place to prevent attackers from exploiting vulnerabilities and escalating their privileges.
By implementing the best practices we discussed in this blog post, you can harden your Linux systems and make privilege escalation exploits harder for attackers. With regular updates and audits, you can stay ahead of potential threats and keep your systems secure.
Remember, prevention is always better than reaction when it comes to cybersecurity. Take action today to protect your Linux systems from privilege escalation and ensure the safety and security of your organization’s sensitive data.